This frequency synthesizer program uses a stereo soundcard to generate a precise carrier or BPSK signal from a GPS 1PPS or reference frequency. The soundcard output can be used directly at VLF or can be multiplied or mixed up to LF. When a PPS is used the output has an absolute phase, maintained across reboots and soundcard reset.
The program makes use of a feedback signal which is used to compensate for variable phase shift in the transmitter and antenna.
You will need:
The program is open source under the BSD 2-clause license.
Download the source code from
http://abelian.org/ebnaut/ebsynth.c
and compile with
gcc -std=gnu99 -Wall -O3 -o /usr/local/bin/ebsynth ebsynth.c -lasound -lncurses -lfftw3 -lm -lpthreadand you might need to prefix that with sudo if you are not running as the superuser. If you get a complaint about ncurses, you'll have to install the ncurses development package. On Ubuntu do
apt-get install libncurses5-devThe command ebsynth -? | less gives you a summary of the command syntax.
For the Raspberry Pi, a pre-installed 32 bit operating system based on Raspios Lite 2021-05-07 'Buster'
is available.
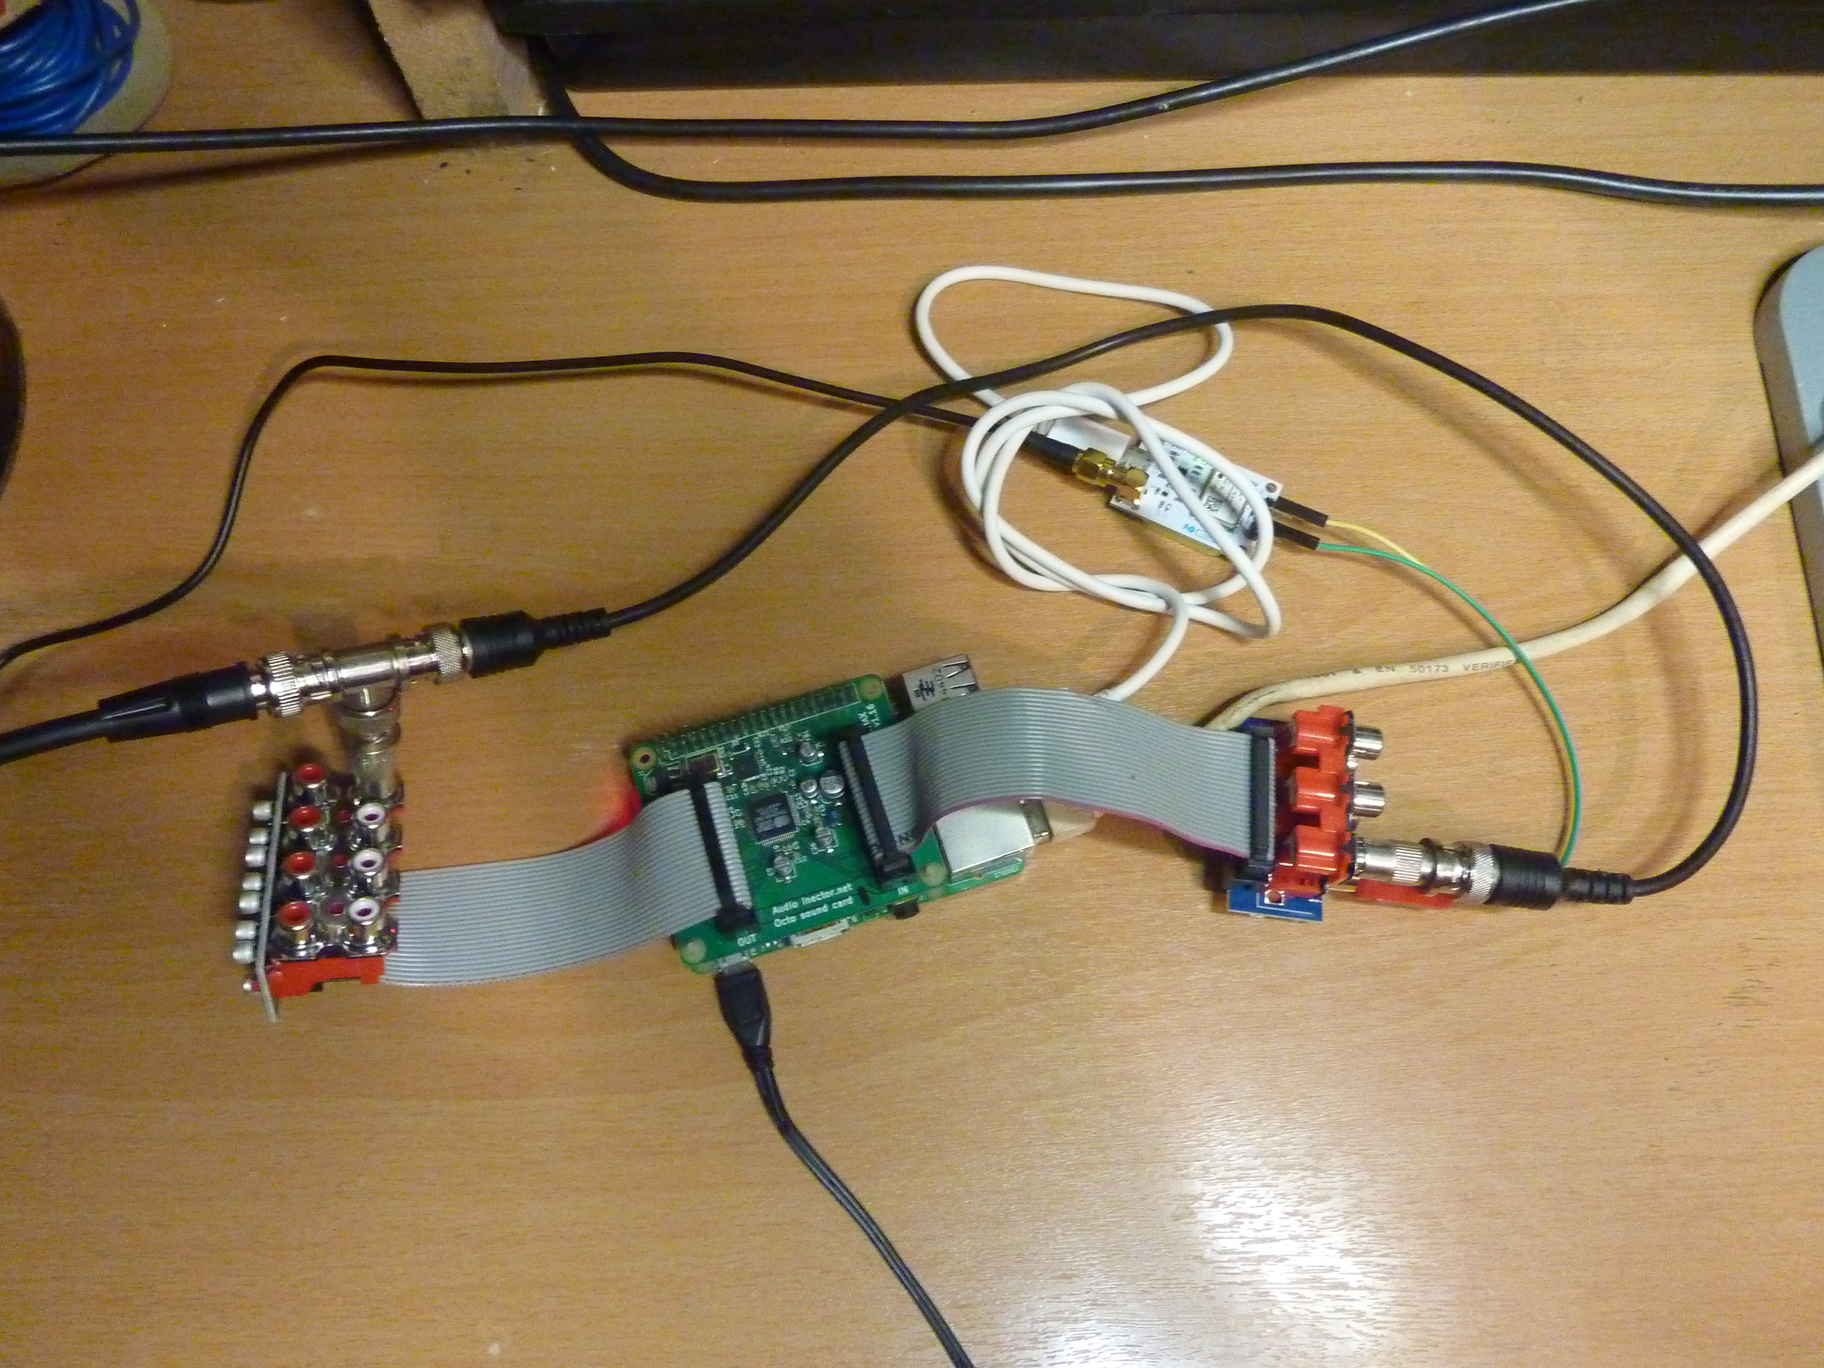
There is an image for the Audioinjector Stereo:
http://5.9.106.210/ebsynth-0.8h-ai.zip
and an image for the Audioinjector Octo:
http://5.9.106.210/ebsynth-0.8h-octo.zip
The images contain ebsynth 0.8h, vlfrx-tools 0.9j and ebnaut 1.1, and the OS is configured for
headless operation with Wi-Fi and Bluetooth disabled.
IP is set by DHCP, see your router's DHCP client list for hostname 'ebsynth'.
Log in as root via ssh, password is 'pi'. Change the password and install your workstation's public
ssh key into /root/.ssh/authorized_keys. Run ./set-mixer to set up the mixer on the
Audioinjector Stereo. The Octo has suitable default mixer settings.
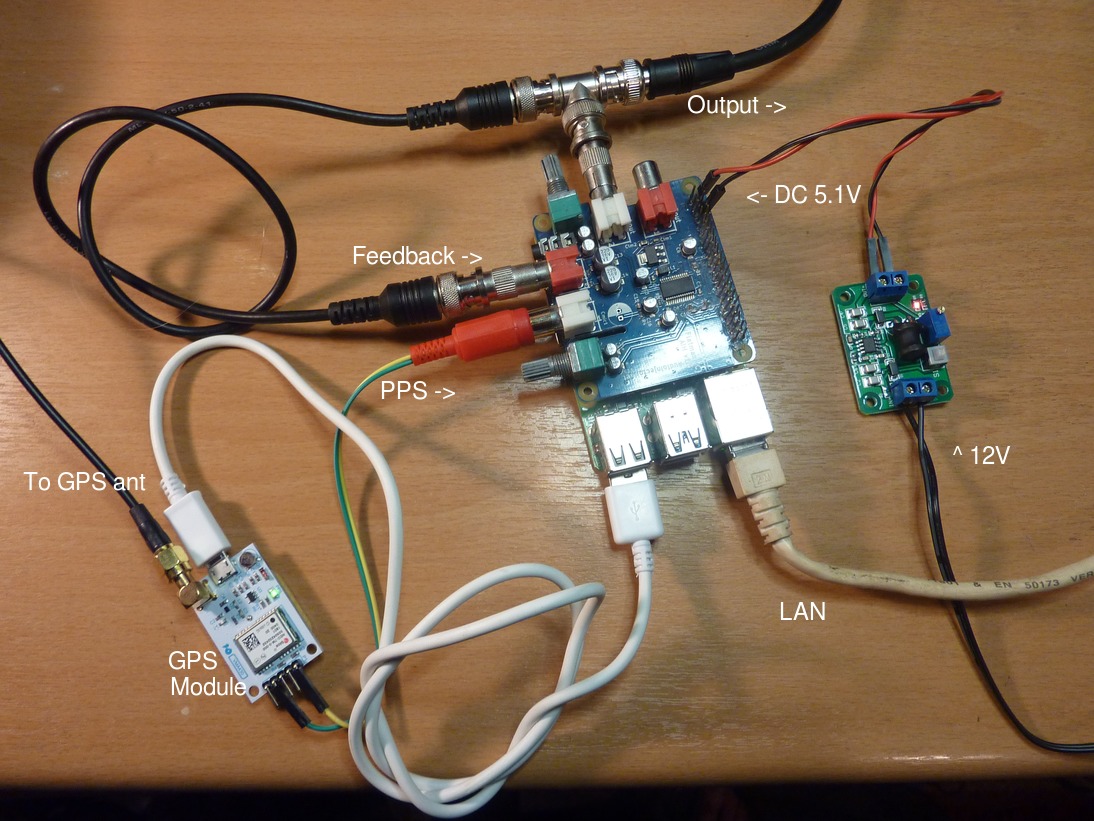
Connect the soundcard as follows:
The GPS module should be set to supply a short (approximately one sample period) 1PPS pulse. If you have a u-blox GPS, this can be done using the u-center program, or directly from linux with the vtubx program from vlfrx-tools. Ideally, save the setting to the GPS memory so that the setting is retained across a power-cycling.
Using vtubx, the setup command would be
vtubx -P 10e-6 -S /dev/ttyACM0which sets up a 10uS pulse appropriate for 96k/sec sample rate.
If your GPS does not provide adjustment to the pulse width, use it anyway. EbSynth will make the best of it. With a short (approx one sample) pulse, you can expect a raw timing jitter of 100nS or less. With a high sample rate and clean signals, you can aproach the limits of the GPS itself at around 20nS. With a long pulse (0.1 seconds), the raw timing jitter is around 1uS, which is still perfectly adequate. In any case, the raw jitter is smoothed before use to reduce the jitter to typically a factor 30 lower than the raw jitter.
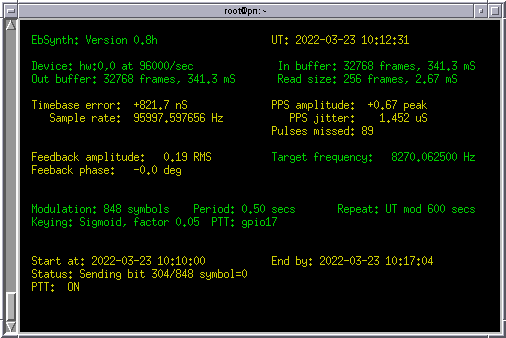
Connect your PPS or reference signal to input channel 1 of the sound card. Ideally this should be a 1PPS with pulse width approximately equal to one sample period. If possible, run the soundcard at its maximum sample rate, this is the default if no -r option is given. The examples below assume you want to generate a signal at 8270.032 Hz.
If you have a 1PPS reference, run something like
ebsynth -d hw:0,0 -F 8270.032 -f 2> /dev/nulland adjust your input mixer settings so that the PPS peak reported by EbSynth is a little less than 1.00.
If you have a 10 Mhz reference divided down by 512 to give 19531.25 Hz at the soundcard input. Run something like
ebsynth -d hw:0,0 -R 19531.25 -F 8270.032 -f 2> /dev/nulland use alsamixer to set the soundcard input gain so that you get a reference amplitude of about 0.5 RMS. The level is not critical and nor is the waveform. The program will take about a minute to stabilise. Use alsamixer to adjust the output level.
A feedback signal may be connected to the channel 2 of the soundcard. If EbSynth is given a -f option it will use this external feedback to stabilise the phase. The feedback signal may be obtained from a near field probe or an antenna current transformer. Use alsamixer to adjust the level of the feedback signal.
Press CNTL-C to terminate the program.
With a -m option, EbSynth expects to read a string of symbols via standard input. The format expected matches the output from ebnaut -et.
In addition to the carrier and reference options described above, you must specify a start time with -T and a symbol period with -S, and optionally a repeat period with -n.
You can pipe the output of ebnaut -et directly into EbSynth, For example,
   echo 'test message' | ebnaut -ep8K17A -N12 -t |
      ebsynth -d hw:0,0 -F 8270.032 -m -S0.1 -T07:00 -n 600
This sends a 12 character message with symbol period 0.1 seconds, to start
at 07:00:00 and repeat at 10 minute intervals. More about start and repeat
times later.
The minimum useful symbol period is 0.02 seconds. The program allows for
the soundcard output buffer delay when timing the modulation.
The -T option sets the start time of the message and always refers to universal time. You can use any of the following formats:
   hh:mm hhmm hh:mm:ss hhmmss
   yyyy-mm-dd_hh:mm:ss
   +sss
If a date is not specified it will assume today unless the time has already passed, in which case it assumes tomorrow. A number of seconds prefixed with a plus specifies a start time some number of seconds from the current time.
If you are taking a harmonic of the output, you should use a -h option to specify which harmonic you are using. This enables EbSynth to select the right amount of phase modulation for the harmonic in use.
When selecting a start time, allow a couple of minutes for the output to stabilise.
The phase modulation is applied by slewing the phase smoothly from one symbol to another using a sigmoid function. By default the slewing takes a fraction 0.05 of a symbol period. You can change this to some other fraction by the option -s sigmoid=fraction, for example -s sigmoid=0.1 to specify one tenth of a symbol period. A linear ramp can be used by giving -s linear and hard keying is obtained with -s hard which might be appropriate at VLF.
 |
 |
 |
An output signal is produced on both channels of the stereo output of the sound device. The program generates PCM at full scale and you must set the actual output level using alsamixer.
By default, both outputs are identical sine waves. The option -o bridge inverts the phase of one of the outputs. This might be useful for driving a stereo amplifier in bridge mode, or for applying your own BPSK modulation externally.
Both outputs can be switched to square wave with -o square. This may be helpful if you are taking a harmonic of the output but it is better to use a sine output and square up the output with hardware.
Option -o iq enables a complex output, where channel 1 is the cosine and channel 2 is the sine. When combined with -h the output phase is set so that the specified harmonic has the 90 degree phase relation between the two outputs.
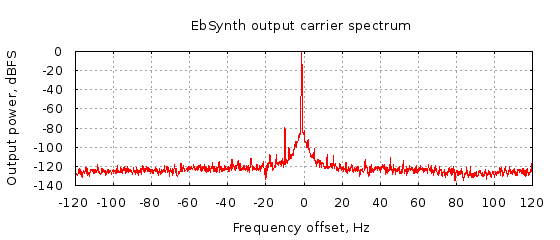
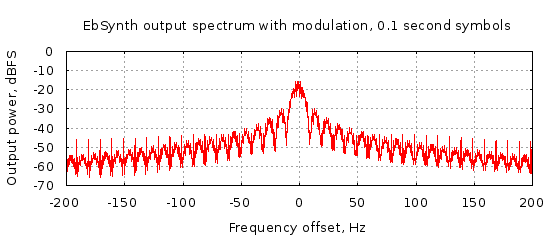
The plots on the right show the output spectrum, with and without modulation.
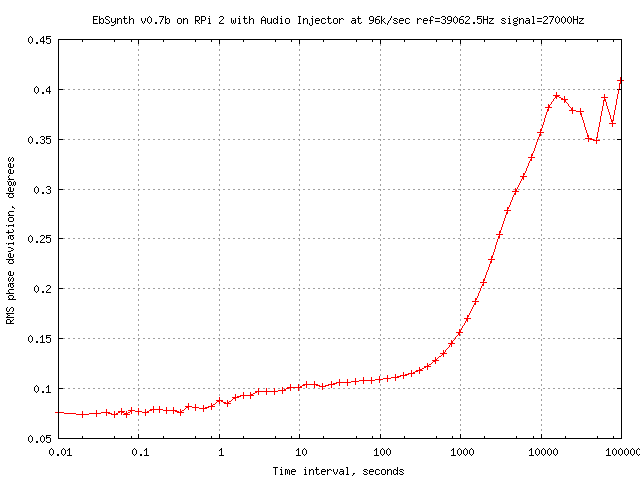 |
The graph shows the RMS difference between pairs of phase measurements made some interval apart. EbSynth is running on a Raspberry Pi model 2 with an Audio Injector sound interface at 96k samples/sec. The output frequency is 27kHz, for operation at 9kHz divide the deviation by three. Deviations at intervals longer than about 1000 seconds are determined by the temperature stability of the A/D conversion oscillator. EbSynth phase and frequency error is related to the rate of change of oscillator frequency. This can be reduced by thermal insulation of the oscillator or the whole sound interface.
The -n option instructs EbSynth to do repeats of the message transmission at start times calculated from the -n value.
The next start time is set to UT in seconds modulo the -n value. For example -n 3600 will start the next transmission on the next available UT hour, and -n 900 will start at the next 15 minute boundary, ie XX:00 or XX:15, and so on. Usually this is the most convenient as EbNaut transmissions tend to be sent in slots aligned to simple UT boundaries such as hourly XX:00 (with -n 3600) or half-hourly XX:00 and XX:30 (with -n 1800).
Sometimes this behaviour is not what you want. For example if you intend a daily transmission at 06:00, the options
-T 06:00 -n 86400will send the first transmission at 06:00 UT but the following transmissions will start at midnights since 00:00 is UT modulo 86400 seconds. To defeat the modulo calculation, prefix the repeat time with +, for example
-T 06:00 -n +86400With the plus prefix EbSynth just adds the repeat time to the previous start time to give you a daily 06:00 start.
Another example, with a message lasting more than 3 minutes and less than 10 minutes:
-T 05:57 -n 600will start at 05:57, followed by UT mod 600 repeats: 06:10, 06:20, and so on. But with
-T 05:57 -n +600the transmissions start at 05:57, 06:07, 06:17 and so on.
EbSynth is able to control the PTT via the DTR and RTS modem control signals of a standard RS232 serial port, or via GPIO pins on a Raspberry Pi. One or more -p options are used to specify PTT operation. -p dev=device gives the serial port to use, for example -p dev=/dev/ttyS0. If -p mcr=dtr+rts is given, DTR and RTS are both asserted (driven positive) to enable the transmitter. If -p mcr=dtr-rts the DTR signal is driven positive and RTS is driven negative.
On the Raspberry Pi you can use -p gpio=number where number is one of the GPIO channel numbers (not the pin number). For example
-p gpio=17drives GPIO17 (pin 11) to +3.3V when the PTT is active. See GPIO Pins to find the mapping of GPIO channel numbers to header pin numbers.
By default, the PTT is activated 2 seconds before the transmission and dropped 2 seconds after the end of the transmission. These times can be modified with -p pre=seconds and -p post=seconds options respectively.
Multiple options to -p can be listed comma separated, for example -p dev=/dev/ttyS0,mcr=dtr+rts,pre=30,post=30.
The RS232 voltages are typically +/-12V on a desktop PC and +/-5V on a laptop PC or USB serial device. On a 9 pin D-type
With a -v option, the program writes messages to standard error which should be redirected to a file so that it doesn't interfere with the display.
ebsynth ... -v 2> logfile
The output frequency is usually within about 1uHz and the long term accuracy equals that of the reference. The phase is usually within 1 degree or less. When the soundcard sample rate drifts, EbSynth corrects for the drift after a short lag and during that lag, there will be a small frequency and phase offset. This can be minimised by minimising soundcard clock drift. On PCI cards, the board can be shielded from fan drafts and the clock crystal can be insulated with foam. USB dongles can be encased in an insulated enclosure, for example by carving out a hollow in a polystyrene block. These measures slow down any rate drift due to ambient temperature changes and the output phase and frequency errors reduce in the same proportion.
You can launch a new terminal session for EbSynth easily with, for example
xterm -e ebsynth -f -d hw:0,0 -F 8270.032 &or
rxvt -fn 8x13 +sb -e ebsynth -f -d hw:0,0 -F 8270.032 &Using xterm or rxvt you can resize with shift-keypad-plus and shift-keypad-minus.
A feedback signal must always be provided, even if it just a direct loopback from the output. You must start EbSynth with a -f option.
Adjust the channel 1 input gain on the mixer so that the PPS peak is below 1.00 to avoid loss of precision due to clipping. Anything 0.1 to 0.9 should be fine.
You must have ntpd running to maintain the system clock within 100mS or so of UT, otherwise the 1PPS will not be reliably detected. It is sufficient to use the default ntpd configuration which will get the time from a pool of internet time servers.
Sound card overruns and underruns must at all costs be avoided. If one occurs, the phase will be lost and there is no way to recover. If the ALSA driver reports overrun on input or underrun on the output EbSynth will exit. There is no point in trying to recover. USB sound dongles may lose USB packets and the driver is not notified. If this happens on the reference input the phase will be lost and will not recover. The output will experience a phase step and will settle down at a new phase. If a USB packet is dropped from the output, there will also be a phase step but if external feedback is in use, the phase will recover to its original value.
In normal operation the output frequency error should be around 1uHz or less, varying randomly plus and minus, and occasionally going above 1uHz. If the reference signal suffers noise or interference, the output error will bounce around much more than this. A likely cause is interference from the transmitted signal itself. You may find the output error is stable with the PA turned off but goes haywire when the PA is on. Another source of problems is mains hum and attention needs to be paid to possible ground loops and power supply problems.
Some USB soundcard don't work properly when running full duplex. Indication of this is a good reference RMS, a sample rate that doesn't settle down, and the reference phase jumping around all over the place. To prove it, run with a -o mute option which turns off the soundcard output. If the sample rate and reference phase then settle down, you have a dongle which doesn't do full duplex properly.
The output phase is fixed but there is no absolute reference. Therefore when you restart the program, it will settle to a new phase.
USB audio does not work very well on the Pi, it is probably not worth trying to use it. EbSynth works well on the Pi when using an I2S HAT such as the Audioinjector Stereo or Octo devices. The Octo card has some bugs and you must use a -x octo option to turn on the work-arounds.
/boot/config.txt when using the Audioinjector Stereo:
dtoverlay=audioinjector-wm8731-audio/boot/config.txt when using the Audioinjector Octo:
dtoverlay=audioinjector-addons,non-stop-clocksThe Octo card sometimes fails to be detected when the Pi boots. This problem is fixed by specifying the required modules in /etc/modules. They should be loaded automatically by the audioinjector-addons overlay but this sometimes doesn't happen due to some kind of race condition.
/etc/modules when using the Audioinjector Octo:
   i2c-dev
   snd_soc_cs42xx8
   snd_soc_cs42xx8_i2c
   snd_soc_audioinjector_octo_soundcard
When using -x octo all eight outputs are driven with the output signal and most -o options are not allowed. This is necessary because the output channels mapping in the Octo is unstable.